Server Upgrade | Citadel Install Inside of a Virtual Machine

Okay! So for now, I’ve landed on Citadel for the email server software that I’m going to use. I’ve bounced around between four different clients (iredmail, Citadel, Ubuntu’s Suite, and Zimbra) and have landed on Citadel because I can install it (lol) and because it suites my needs better. The other software suites are basically wrappers of a bunch of smaller discrete softwares that build up the Ubuntu Suite. This is fine for dedicated servers, but since I’m going to be running this inside of a Virtual Machine, it is more convenient for me to use Citadel.

The install is pretty simple once you get the prerequisites installed and prep the VM itself.

Since it’s a server, a static IP address on the network will be very useful. Setting the IP address of a Virtual Machine is surprisingly simple, or at least it is in my case.

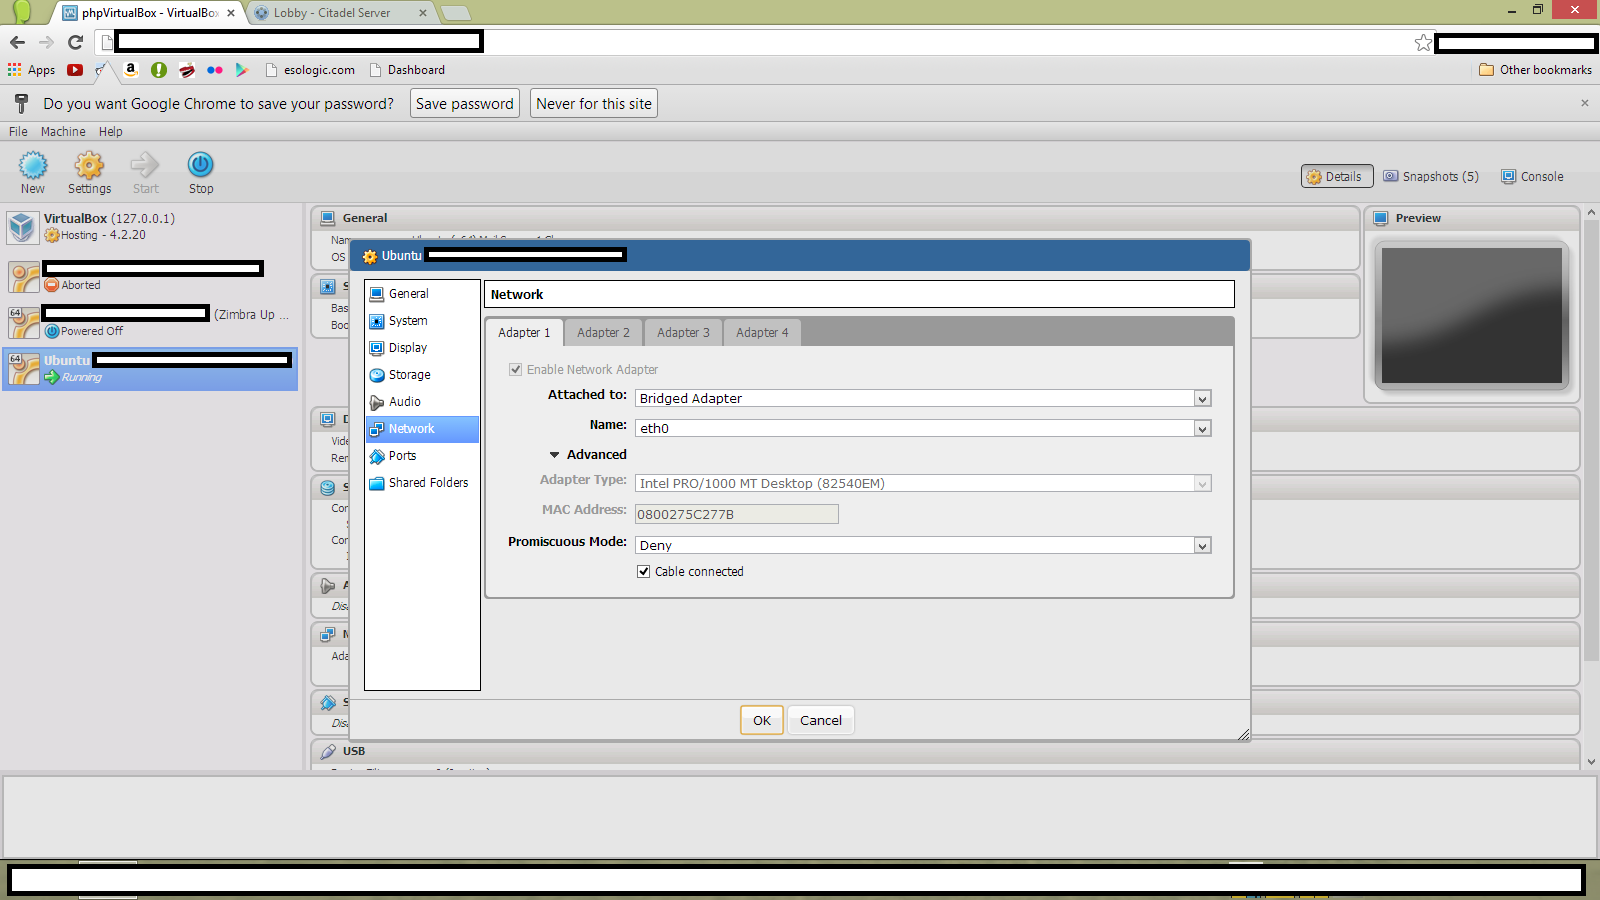
You set the IP you want manually as done here, and to configure the VM you set the network to be attached to a bridged adapter as seen here:
To install citadel, run the following commands per the citadel install guide.

And the install should go off without a hitch. You can then navigate to yourserverip/mail to access citadel.

Server Upgrade | Stress Testing

So I wrote a program that makes really big numbers in python in an attempt to break a VM. Here’s the code:

I left it on for a few days and ended up with this:

Someone try and beat 26 compounds!

Server Upgrade | Understanding and Accessing VM’s

Eventually, I’d like to migrate this website to the new server that I’m working on now, and to be able to do that I’m probably going to need to be able to use SSH to access the server, access files from it using S/FTP, use some sort of apache webserver etc etc.

Turns out, it is comically easy change the ports on a virtual machine using phpvirtualbox, and I was expecting to have to write a much longer post than this.


Server Upgrade | Getting a VM running

Alright! Time to get VM’s rolling.

I’m going to be running phpvirtualbox on Ubuntu Server 12.04.3. The phpvirtualbox software will work really well because it’s web based and the server is headless.

Basically I’m following these guides:

http://www.howtoforge.com/vboxheadless-running-virtual-machines-with-virtualbox-4.1-on-a-headless-ubuntu-12.04-server

http://www.howtoforge.com/managing-a-headless-virtualbox-installation-with-phpvirtualbox-ubuntu-12.04

https://gist.github.com/dominicsayers/3012172

And doing the following:

Install VirtualBox – note you will most likely need to upgrade

Add the line

To that file then exit by hitting ^X. Continuing:

Then install phpvirtualbox

Edit this file to set $username and $password match the user you created earlier
Also add the following disable phpVirtualbox’s authentication:

Then ^X to exit. Continue with the installation:

Add the line:

Then ^X to exit. Start virtualbox with:

And then navigate to yourserversip/phpvirtualbox

Then getting a virtalbox VM running inside of that is easy!

Server Upgrade | Pictures!

Alright so the build works, here are a bunch of pictures!

The final setup!

Server Upgrade | Initial Build Spec

Hello! Long time no write!

Lemme jump right in, the server that hosts all of my content is dying. Right now, I get around 200 hits a day, and that’s only rising (thanks youtube dudes!) which is really taking a toll on the server. It’s an HP laptop that has been on for almost two years straight, in addition to being my only computer for 4 years before that.

The only reason this is worth writing about is because I intend on using this machine for a few things other than hosing a WordPress server (hopefully I’ll write a post about migrating a content rich blog across servers).

I also want to run a series of email servers on the machine as well! It would appear that a series of virtual machines would be the most efficient way to accomplish this.

Here is a list of the components that I have ordered: http://pcpartpicker.com/user/egg/saved/3deW

Accessing both SPI ports on the raspberry pi using python

Turns out it’s not that hard at all! Here’s a video of the whole thing working:

This basically works around concepts I first explained here. It’s still really cool though! SPI is really fast and really easy to use, perfect for a novice like me.

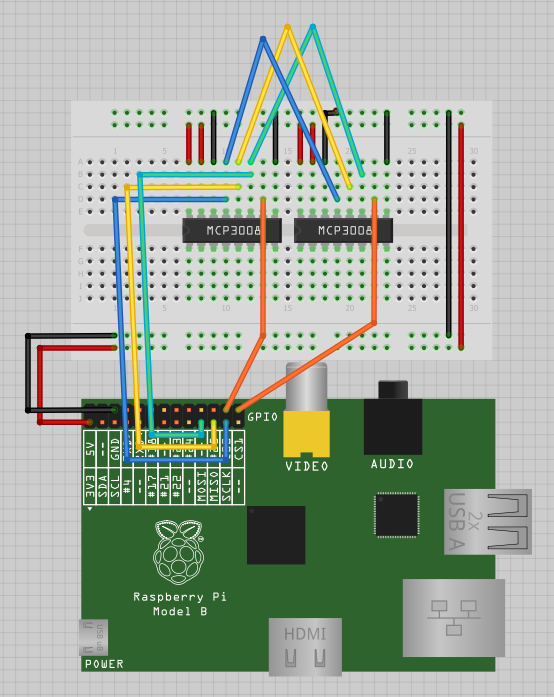
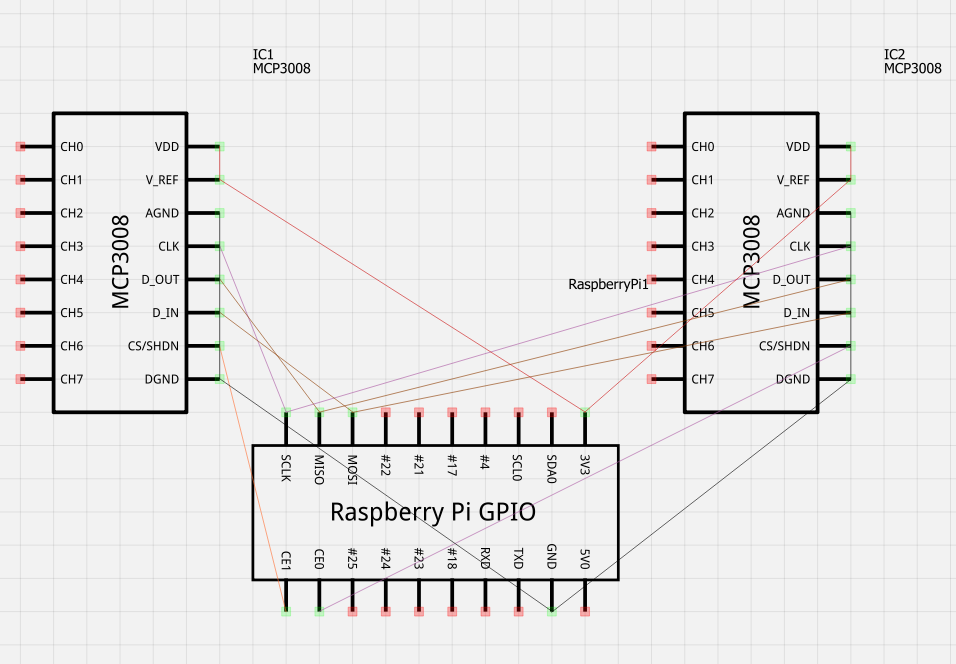
Here are the physical representations and schematics of the setup seen on my desk:

Images generated by fritzing.

Here’s the code that makes it all work!

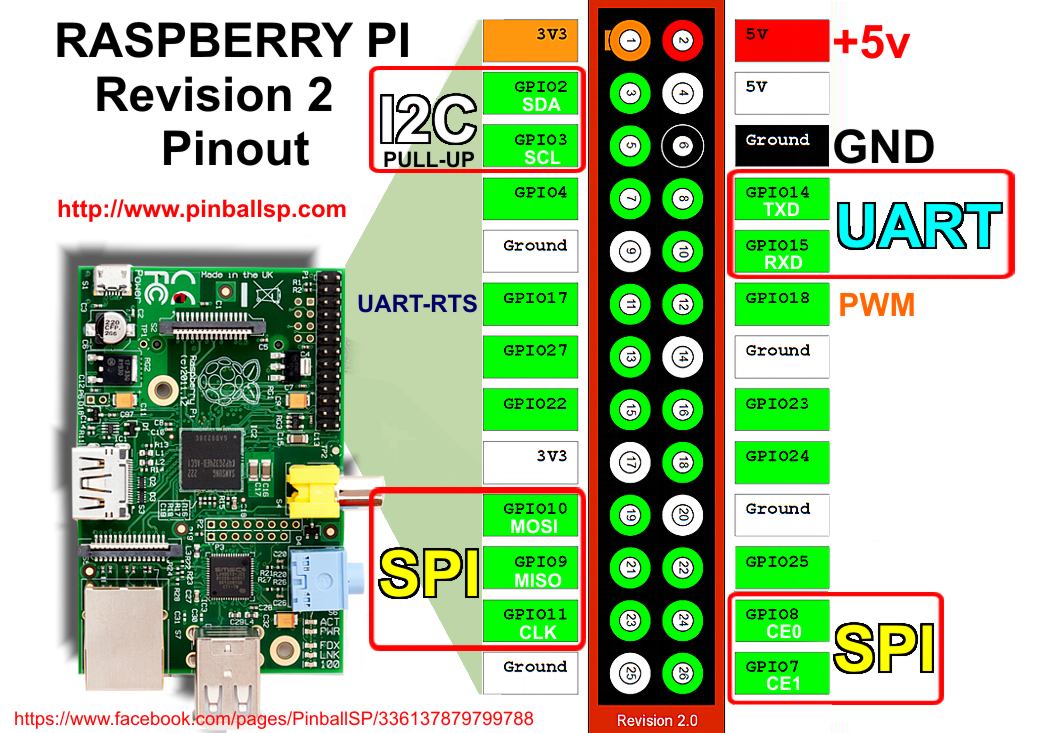
Here is some further reading:

http://www.megaleecher.net/sites/default/files/images/raspberry-pi-rev2-gpio-pinout.jpg

http://hertaville.com/2013/07/24/interfacing-an-spi-adc-mcp3008-chip-to-the-raspberry-pi-using-c/

http://tightdev.net/SpiDev_Doc.pdf

Thanks for reading!

Using a pair of Arduinos to mimic a keyboard

Here’s a video:

So in my last post I showed you a way that I used a single arduino to talk to a Raspberry Pi (or any other computer) over HID. I’ve updated the project a bit and now I can input any number of things into the pi. Basically this is how it works.

Serial Console on computer -> Arduino Mega -> software serial port -> Arduino micro -> HID on other second computer (in this case the Pi)

There are two buttons that handle pressing the enter key and the delete key as those are hard to send over serial.

There are a few bits of relevant code, both for the arduino. Here’s the mega’s code:

And here’s the side for the arduino micro, that writes as an HID.

Using Arduino Micro as a USB keyboard for Raspberry Pi

Greetings from WPI! Here’s a video:

Desperate times call for desperate measures. I recently found out that a club at my school is essentially a hackerspace equipped with 3D printers so I could finally print enclosures for the PiPlanter and the DSFU. But that means I would need to finial the designs for both of them. I needed to find a way to interface with this thing here. So being the idiot that I am, I forgot a USB keyboard, I forgot an analog video cable, I forgot a monitor for the pi and forgot to update the Pi to the latest Raspian build.

What I did bring was an Easy Cap Capture Card in addition to my standard idea-kit which among other things consists of an Arduino Micro, some buttons, some resistors, and wire.

Essentially all I needed to do was connect the Pi to the EasyCap, and be able to send 4 different phrases to it over the keyboard. I needed to be able to send ‘pi’,’password’ (not my actual password), ‘ifconfig’ and enter. I realized that I could easily send this data to the Pi via the Micro as it has the Keyboard. functions built in.

As you can see in the video it worked! And I’m kind of stunned that it did. I can now SSH into the Pi.

Here’s the code for the Arduino:

Thanks for Reading!

PiPlanter | Goals and changes

So I am 151 miles away from the PiPlanter. But thanks to the internet, modern day routers, and wifi dongles I can pretty much control everything about it from here.

That being said, there are a few things I would like to change about the project. First of all, the program itself needs to be more modular. Reason being is that the core program should never stop running, even if changes need to be made. I should be able to screen the main program once, and then never have to stop it ever. This would be advantageous in a few ways but the main example is that the plants will require more water as they get larger, and then less once they start yielding fruit. I could script this, but I think that it would be best to be able to edit the ‘ontime’ value from the program without having to stop the whole process.

I’ll keep y’all posted as I try to implement this.