How to host private Python packages on Bitbucket for free, AND how to use them in a circleci pipeline

Bitbucket is great for hosting private git repos. Turns out, it can also be used to turn those repos into python packages that you can integrate into your projects with pip. This took a bit of trial and effort to make happen, let me know if there is anything additional you had to do to get things working on your end and I can add them to the guide.

Background

This whole process is built on pip’s ability to install packages from common VCS’s using SSH keys for access credentials. The syntax for doing that looks like this:
pip install git+ssh://git@bitbucket.org/esologic/sample_project.git
Pretty slick, you can even specify a branch or tag:
pip install git+ssh://git@bitbucket.org/esologic/sample_project.git@master # on the master branch 
pip install git+ssh://git@bitbucket.org/esologic/sample_project.git@0.0.2 # on the version tag of 0.0.2
Since this repo is public, let’s try installing the package into a python virtual environment:
(venv) dev@ESO-3:/tmp$ pip install git+ssh://git@bitbucket.org/esologic/sample_project.git
Collecting git+ssh://git@bitbucket.org/esologic/sample_project.git
  Cloning ssh://git@bitbucket.org/esologic/sample_project.git to ./pip-sjec1gbh-build
git@bitbucket.org: Permission denied (publickey).
fatal: Could not read from remote repository.

Please make sure you have the correct access rights
and the repository exists.
Command "git clone -q ssh://git@bitbucket.org/esologic/sample_project.git /tmp/pip-sjec1gbh-build" failed with error code 128 in None
No dice. It didn’t work because our development environment isn’t configured correctly. Let’s get started with the guide.

Using private repo packages locally

Note: I’m on ubuntu 18.04, but I will leave Windows notes in each step if applicable.

Step 1: Make sure your repo CAN be installed as a python package

The key here is a proper setup.py file. Here are best the best set of docs I’ve found on how to make this file.
You can also look at the test repo for this project (https://bitbucket.org/esologic/sample_project/src/master/), it contains an example setup.py. This repo will also be the standard example for this post.
To make sure things are working correctly, you can try installing the package into your local python environment, or into a virtual one like I’m doing. Using sample_project as an example, we can do this like so:
(venv) dev@ESO-3:/tmp$ pip install /mnt/c/Users/dev/Documents/misc_git/sample_project/
Processing /mnt/c/Users/dev/Documents/misc_git/sample_project
Installing collected packages: sample-project
  Running setup.py install for sample-project ... done
Successfully installed sample-project-1.0
(venv) dev@ESO-3:/tmp$ python
Python 3.6.8 (default, Jan 14 2019, 11:02:34)
[GCC 8.0.1 20180414 (experimental) [trunk revision 259383]] on linux
Type "help", "copyright", "credits" or "license" for more information.
>>> from sample_project import print_quote
>>> print_quote()
If they can get you asking the wrong questions, they don't have to worry about answers.
>>>

If your package behaves as expected when installed like this locally, you’re all set to push the changes to your bitbucket repo and continue with the rest of the guide.

Step 2: Create SSH keys and add them to bitbucket

Note: at a few places in this step I use my own email as a reference, dev@esologic.com. Make sure whenever you see that, to substitute email address associated with your bitbucket account.
If you already have ssh keys created on your computer or whatever you’re developing on, they should be located at ~/.ssh. If you don’t see both id_rsa and id_rsa.pub files in that directory, create them with:
ssh-keygen -m PEM -t rsa -C "dev@esologic.com"
Leave passphrase blank.
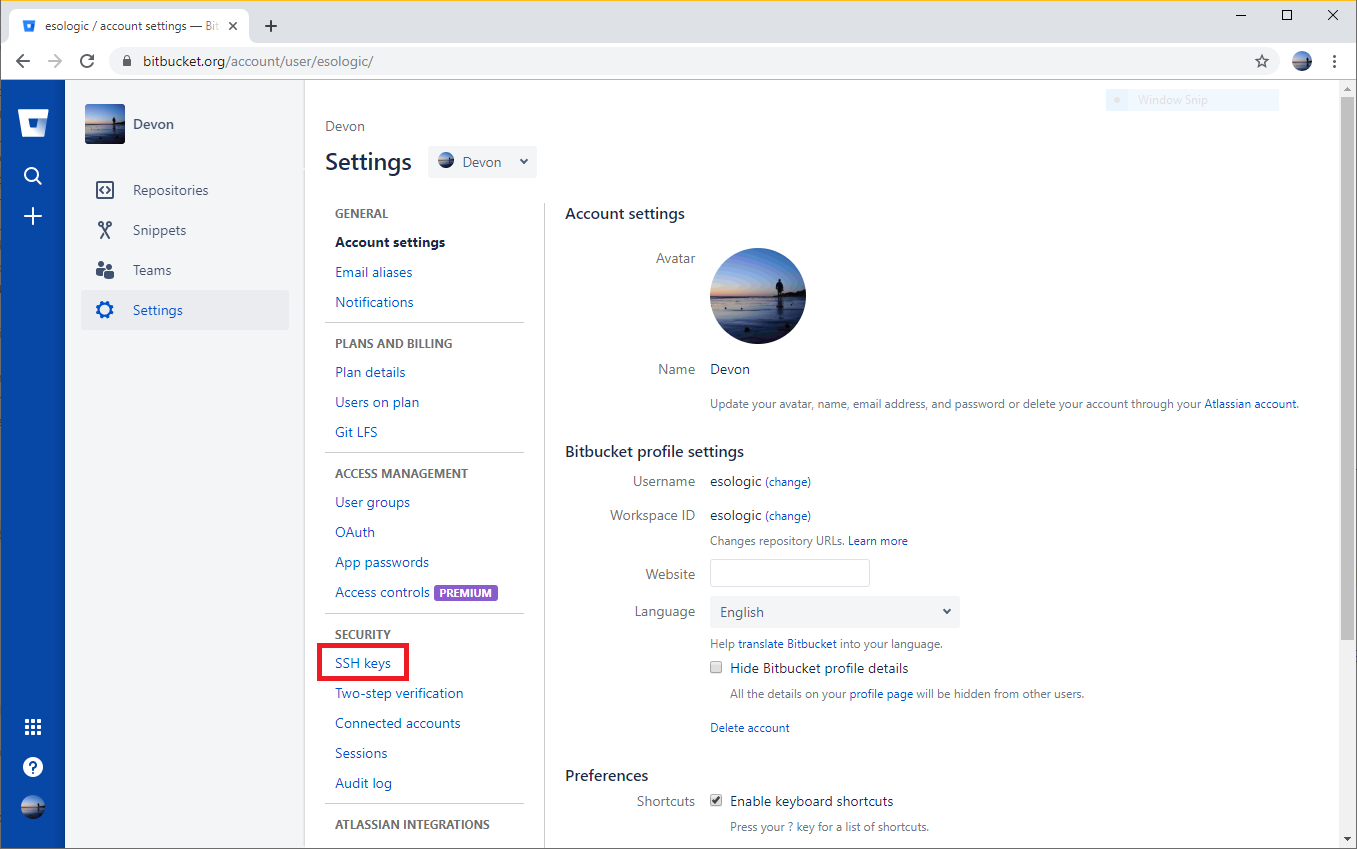
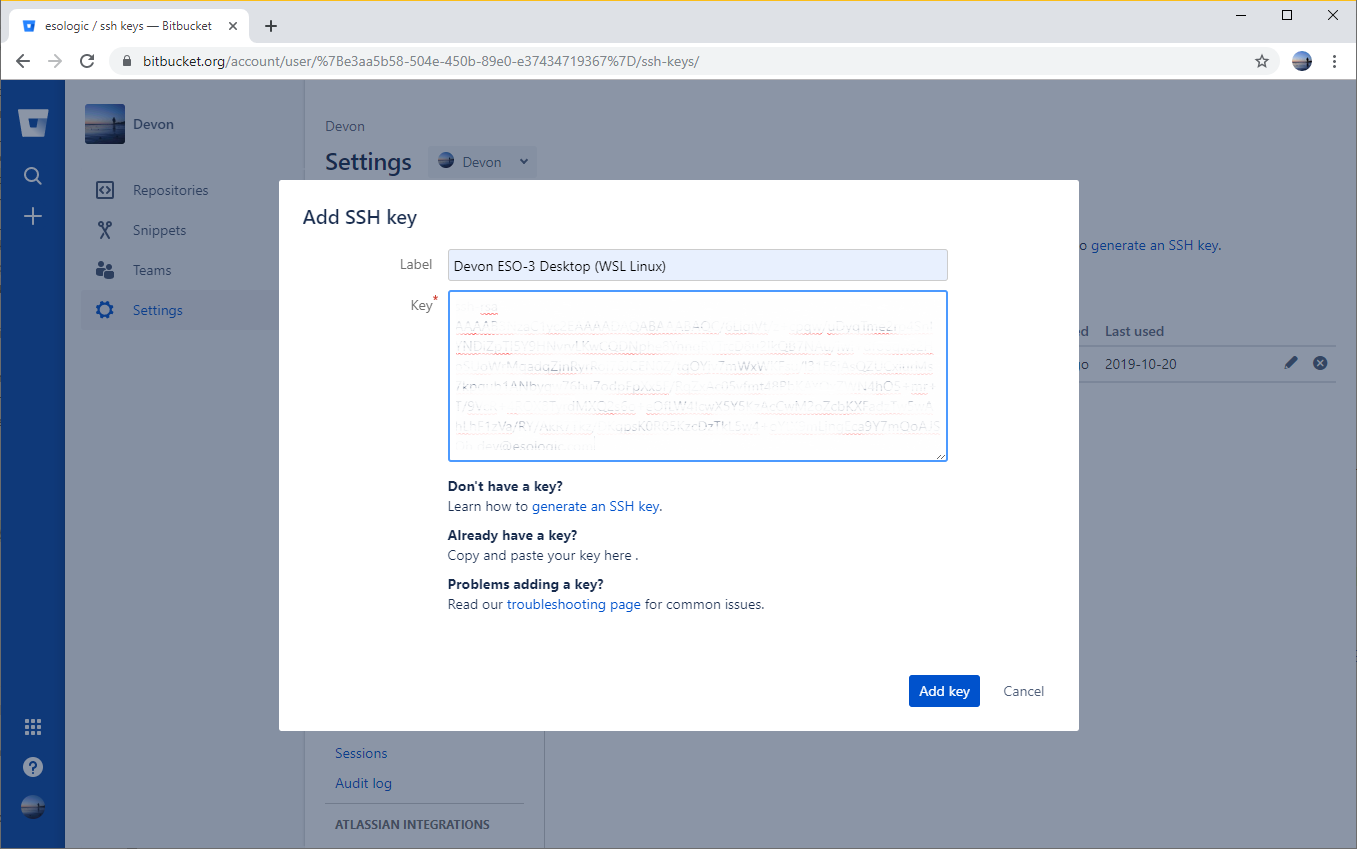
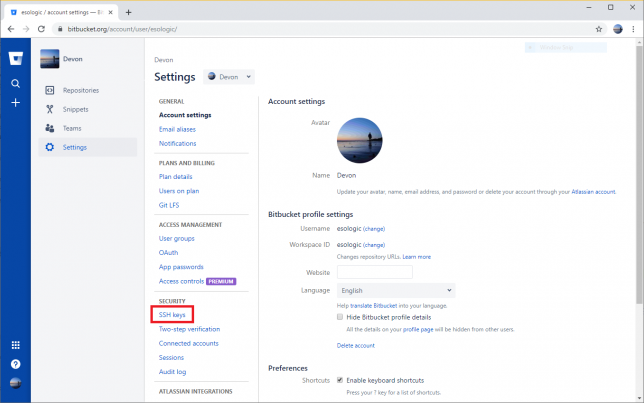
Now, copy the contents of ~/.ssh/id_rsa.pub to bitbucket. The following images should walk you through the steps, make sure to give the key a memorable name.
Now, the ssh key of whatever dev environment you’re on is added to bitbucket.

Windows steps to create ssh keys

I followed these two (1, 2) guides to create ssh keys on windows.
The short version goes something like this:
$ ssh-keygen -m PEM -t rsa -C "dev@esologic.com" -E md5
$ cd C:\Users\dev\.ssh
$ ssh-add id_rsa
$ ssh -T git@bitbucket.org
Then follow the step above to add the keys to your bitbucket account.

Step 3: Make sure your account can read from the private repo with your python package

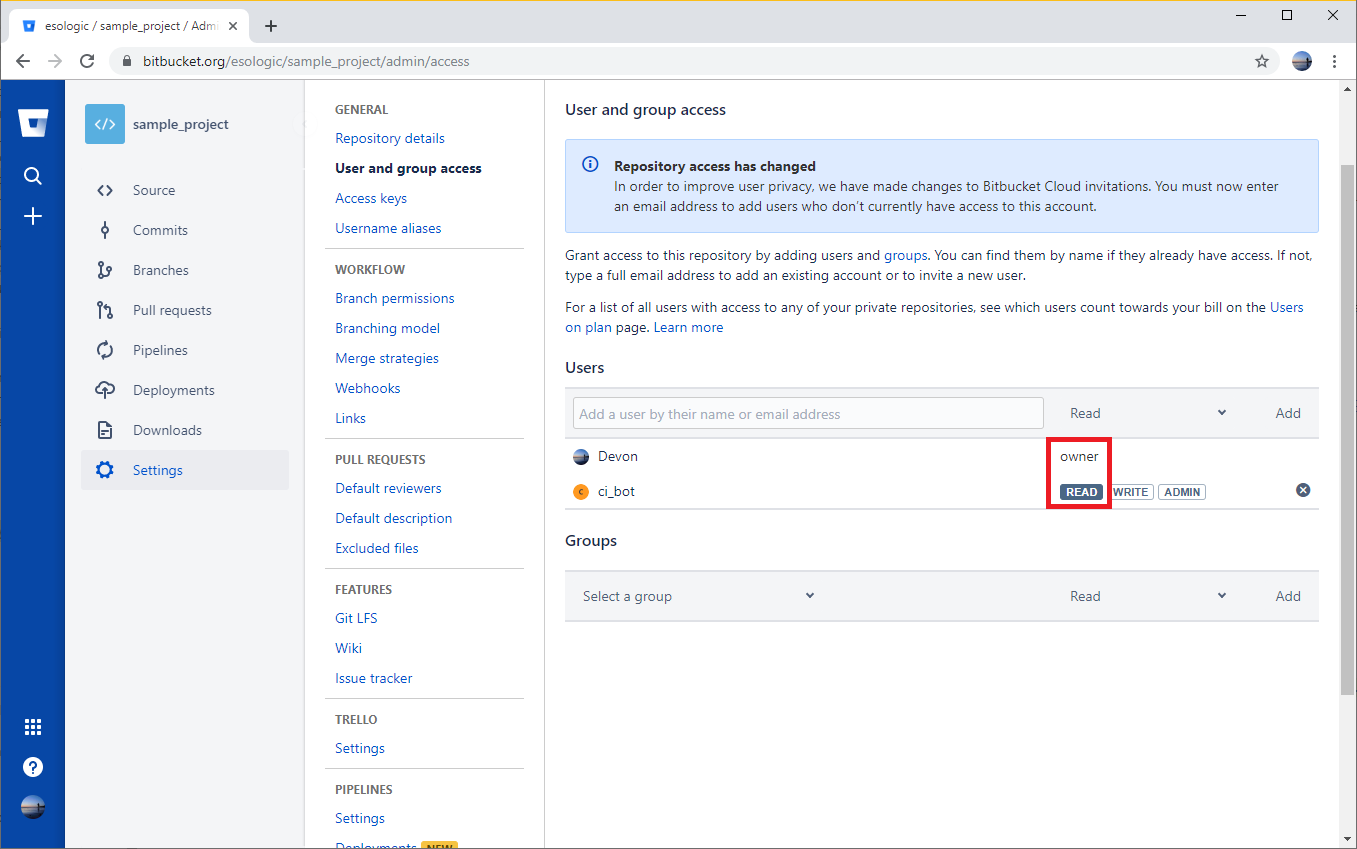
This is a simple, but a trap for young players. Make sure the account you’re trying to install the module with has at least read settings on the repo.

Since the Devon account is an owner of the repo, it will be allowed to read from the repo. The account ci_bot will also be able to read from the repo because it has read permissions.

Step 4: Install the package from bitbucket

With the bitbucket repo permissions set, and your SSH key added to your bitbucket account, you should be able to re-run the installation command from earlier and use the package.
(venv) dev@ESO-3:/tmp$ pip install git+ssh://git@bitbucket.org/esologic/sample_project.git
Collecting git+ssh://git@bitbucket.org/esologic/sample_project.git
  Cloning ssh://git@bitbucket.org/esologic/sample_project.git to ./pip-nkrqsxao-build
setsockopt IPV6_TCLASS 8: Operation not permitted:
Installing collected packages: sample-project
  Running setup.py install for sample-project ... done
Successfully installed sample-project-1.0
(venv) dev@ESO-3:/tmp$ python
Python 3.6.8 (default, Jan 14 2019, 11:02:34)
[GCC 8.0.1 20180414 (experimental) [trunk revision 259383]] on linux
Type "help", "copyright", "credits" or "license" for more information.
>>> import sample_project
>>> sample_project.print_quote()
If they can get you asking the wrong questions, they don't have to worry about answers.
>>>

Fantastic! Remember, your pip command git+ssh://git@bitbucket.org/esologic/sample_project.git will be different for your package. It will look something like this: git+ssh://git@bitbucket.org/{your username}/{your project}.git.

Any user that you give read permissions to on the repo will be able to install your package as well. This includes a machine user, so your CI builds can use your private package as well, which I’ll show you how to do next.

Using private repo packages in circleci

Bitbucket and circleci go together like peanut butter and chocolate. Adding CI to a bitbucket project is made fast and easy using circleci.

Step 5: Create a “machine user” in bitbucket

This user should have read only access to the package repo that you want to add to ci, so in this example it’s the sample_project repo.
You can accomplish this very easy through the BB ui, just make sure to keep track of whatever username and password you decide on.
Just to be clear, a machine user is just a regular bitbucket user that is only used by machines.

Step 6: Create SSH keys and add them to your machine user’s account

On whatever you system you have been using so far, enter the following commands and remember to leave passphrase blank.

mkdir ~/.ssh/ci_bot_keys
ssh-keygen -m PEM -t rsa -C "ci_bot@example.com" -f ~/.ssh/ci_bot_keys/id_rsa

Add the contents of ~/.ssh/ci_bot_keys/id_rsa.pub to bitbucket while signed in as your machine user like we did in step 2.

Step 7: Try git+ssh key insertion locally

(Note: you can skip this step, but if things don’t work when you add the step to your CI build start looking for errors here.)

By setting the environment variable GIT_SSH_COMMAND you can select which SSH key gets used by pip when doing an ssh pull.
Let’s try out the concept, and try out our new key locally. Run these two commands:
export SSH_AUTH_SOCK=none
export GIT_SSH_COMMAND='ssh -i ~/.ssh/ci_bot_keys/id_rsa'
And then install your project like you did before. The package should install no problem, and you should see the same output as step 4.

Step 8: Set the `$KEY` environment variable in circleci

We now want to make the private key we made for our ci bot (~/.ssh/ci_bot_keys/id_rsa) available to the circle build process.
The only tricky part here is that the private key will contain newlines. For simplicity, we can replace them with underscores, and add the newlines back in the circle build.
Copy the output of this command to your clipboard:
(venv) dev@ESO-3:/tmp$ cat ~/.ssh/ci_bot_keys/id_rsa | tr "\n" "_"
The output ends after -----END RSA PRIVATE KEY-----_ in case your terminal doesn’t wrap correctly.
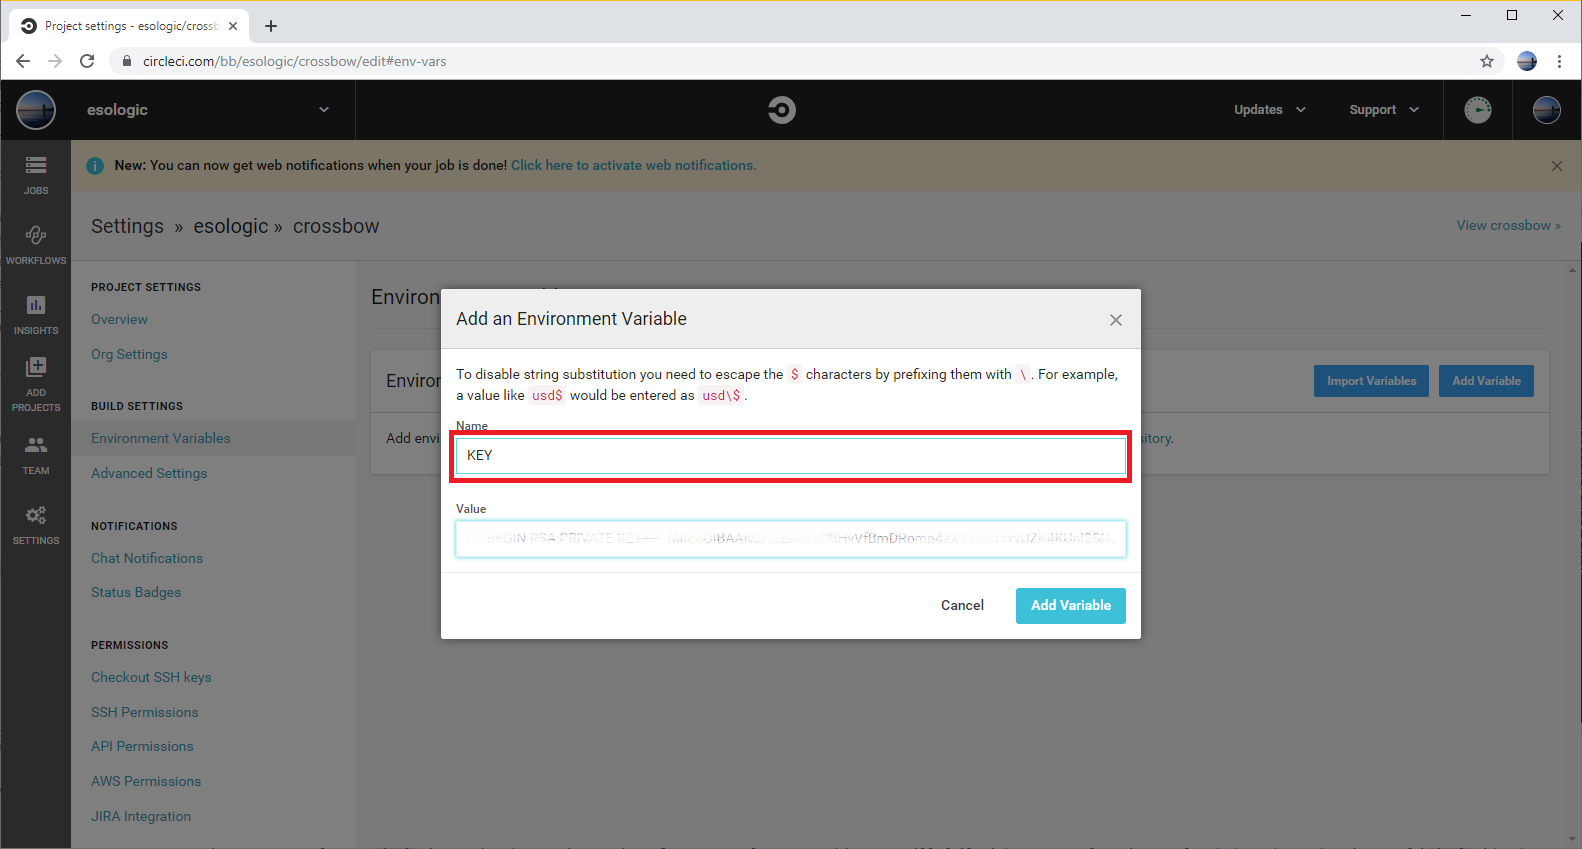
Now we need to set this value to the env var $KEY in the circleci build that we are trying to use our private package (sample_project) in.
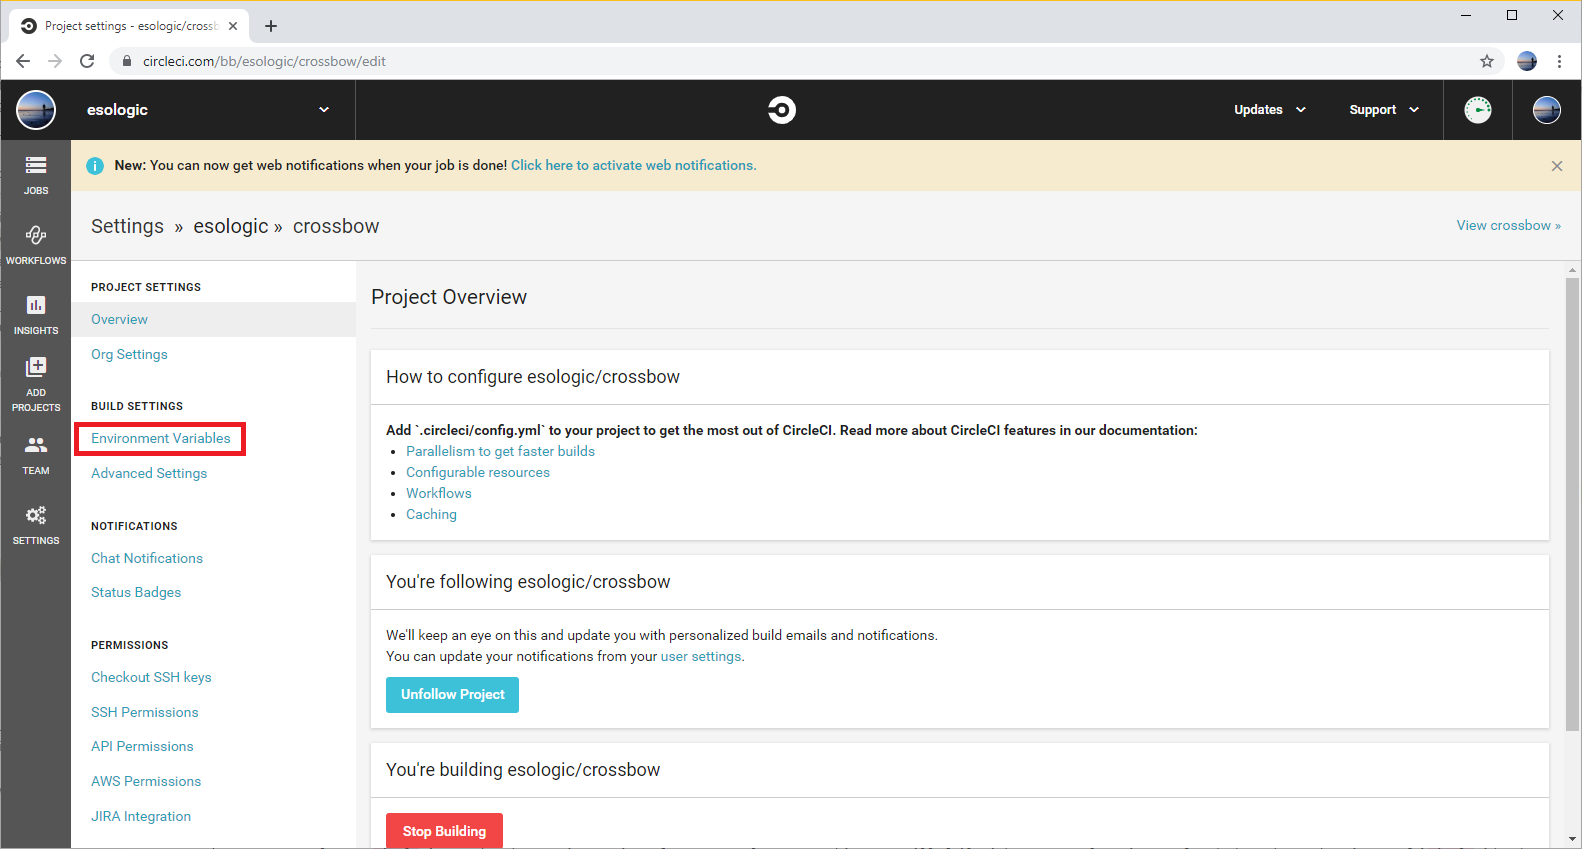
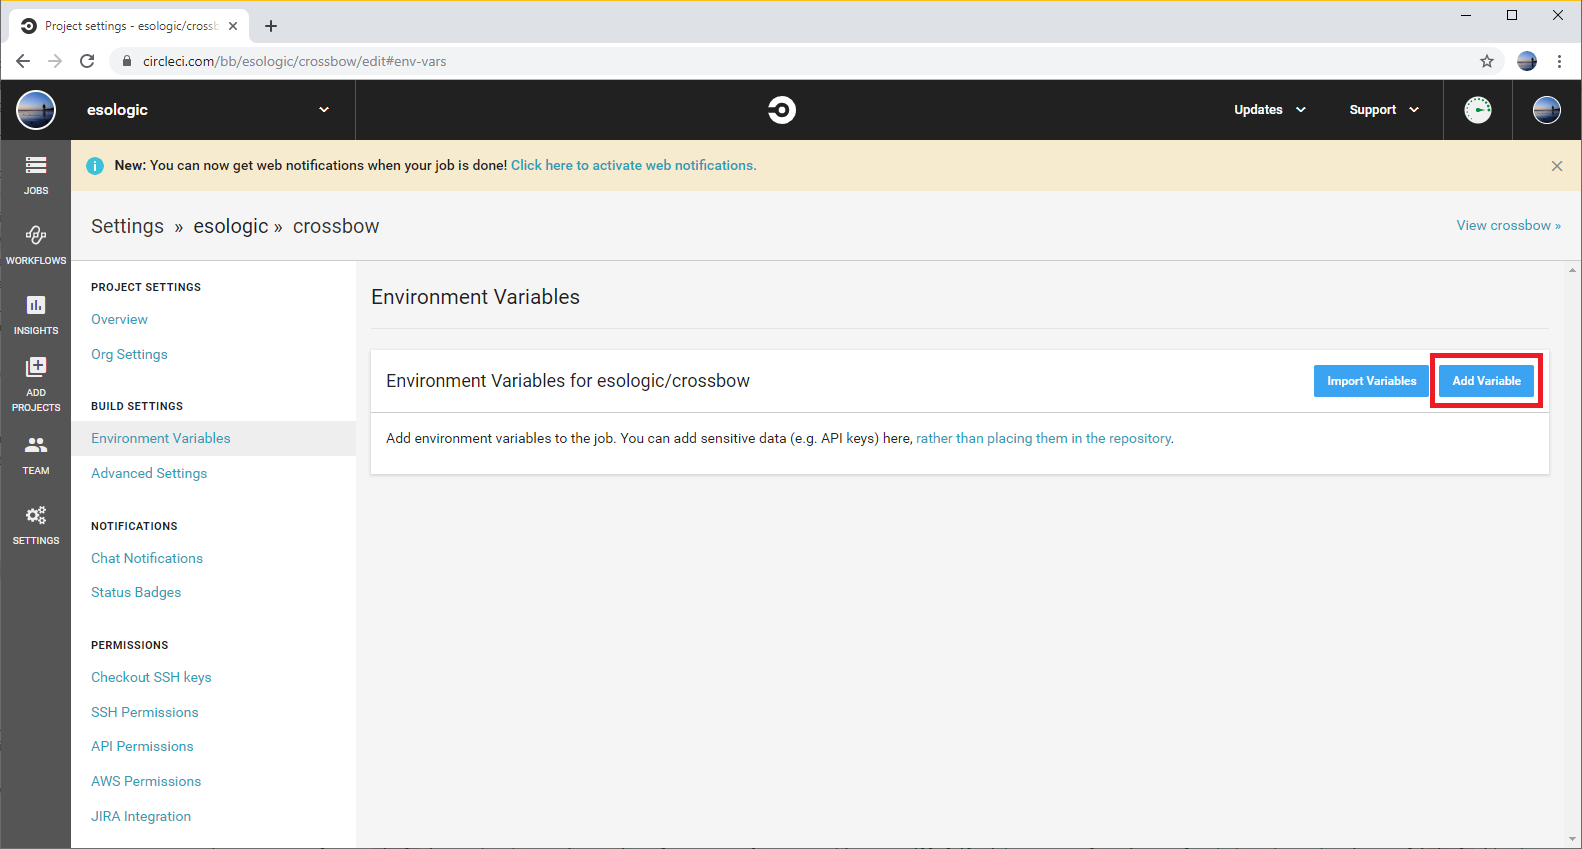
Click the gear on the project page for your project in circle. For me, this brought me to https://circleci.com/bb/esologic/crossbow/edit, where crossbow is the name of my project.
Go to build settings -> Environment Variables and then set the variable like so:

Now that the variable is set, we need to change our circle config to use it.

Step 9: Add the step to your /.circleci/config.yml file

This does the same thing that we just tried locally, but in circle.

You have to make sure that the export GIT_SSH_COMMAND step happens in the same step as any pip commands. Your full  dependencies  installation circle step may look something like this:

- run:
    name: Install Dependencies
    command: |

      # Give us access to private repos
      export KEY_PATH=tmp_id_rsa
      echo -e "${KEY//_/\\n}" > $KEY_PATH
      chmod 600 $KEY_PATH
      export SSH_AUTH_SOCK=none
      export GIT_SSH_COMMAND='ssh -i $KEY_PATH'

      python3 -m venv venv
      . venv/bin/activate
      pip install -r ./requirements.txtts.txt

Make sure you select a circle image that has a git version of 2.17.0 or later, or this step will fail without an explanation. I found that the python image of circleci/python:3.7-buster worked when testing.

Try running your job, with this step added, it should be able to pull the package from your private repo. Let me know if you run into issues and I can try to help you out. Maybe donate the money you saved on hosting fees to me via paypal? 🤷💖

Thanks to

  • http://redgreenrepeat.com/2018/05/25/specifying-different-ssh-key-for-git/
How to panelize KiCAD designs for free

Check out this comment for some tweaks to this guide to support the latest version of the tools!

Panelization is the process of taking two or more PCB designs and combining them using tabs or v-scores that you would then separate into individual boards once they come back from manufacturing. It’s a way to get more than one design made in a single order.

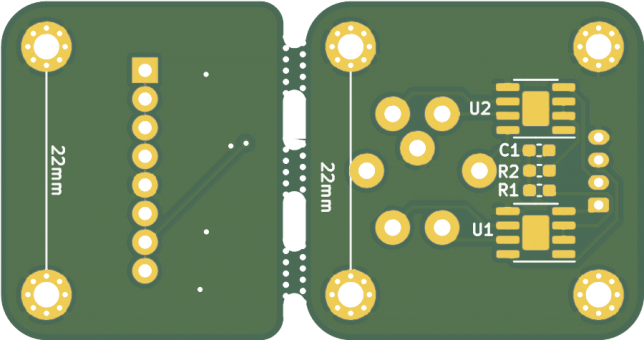
There are a few forum posts or other snippets on how to accomplish this out there already, but not a real guide. For my own sake, this is how you can do this panelization using all free tools. Here are some photos of a board I had fabricated by OSH Park using this panelization method:

I implement this technique whenever I’m creating closely-related PCBs.

The design highlighted in this blog post is a transmitter/receiver pair, meaning that there would never be a transmitter without a receiver, or vice-versa.

Design is made simple by doing the layouts individually, and manufacturing is made simple by getting them made as a single board, not having to coordinate multiple orders. Let’s get started with the guide.

1. Download The Tools

You probably already have KiCAD. Next, make sure to download GerberPanelizer by This is not Rocket Science (site link) from GitHub. This guide uses the 2018-08-10 snapshot release.

2. Export your designs from KiCAD

Your designs have to be completely ready for production before starting this process. Components placed, tracks laid, zones poured etc. It is very “one-way” in that it is impossible to update an already panelized design once it has been exported.


Here’s one of the designs that will be added to the panel.

You’ll want to add a grid origin that is really close to your design. In KiCAD, select placegrid origin to do this. I am putting it in the top left hand corner of the board.


Grid origin placed

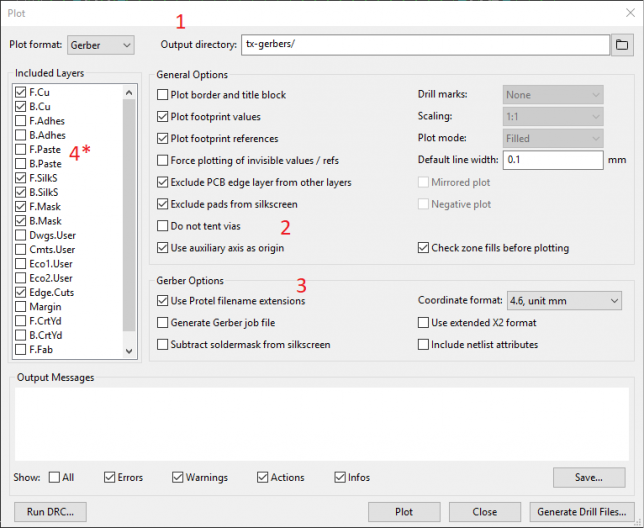
In pcbnew, select fileplot to adjust the gerber export settings.

  1. Make sure Output directory is set to an empty directory somewhere on your disk. In this example, it’s set to tx-gerbers.
  2. Check Use auxiliary axis as origin
  3. Check Use Protel filename extensions
  4. *Optional* Since I’m not using them in this design, I’ve unchecked F.Paste and B.Paste.

And then click Plot.

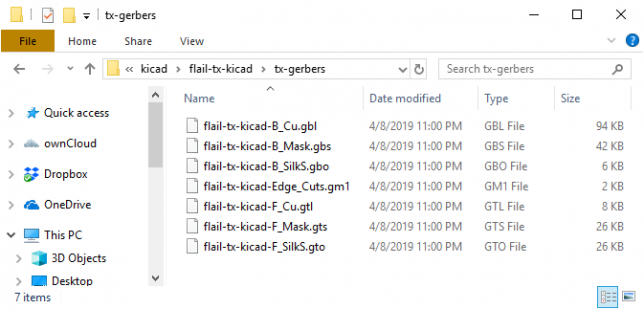
You should be greeted with a directory of files with dissimilar extensions:

Next, you need to export the .drlfiles.

Select filefabrication outputsDrill (.drl) File...

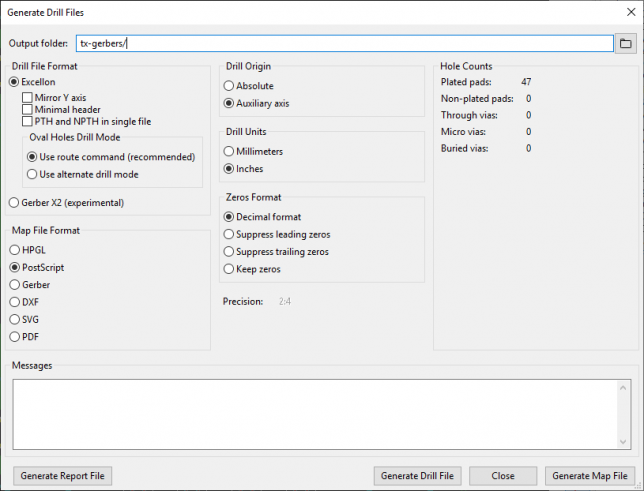
These settings will automatically be set to match the previous export, but make sure the output folder and the drill origin match the previous settings. Mine looked like this:

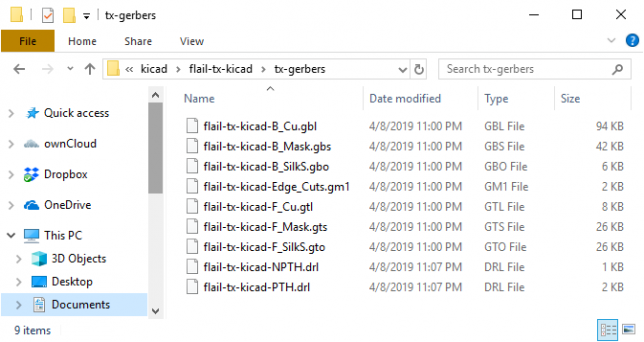
Here is my resulting output directory with all of the files:

3. Modify the exported files

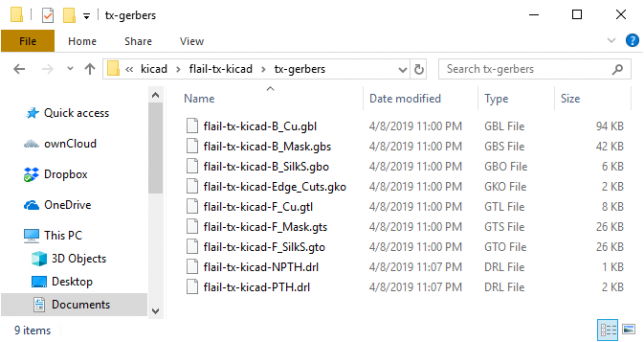
This step is weird. You need to change the extension of all .gm1 files to .gko. For this example, flail-tx-kicad-Edge_Cuts.gm1 needs to be renamed to flail-tx-kicad-Edge_Cuts.gko as this is what GerberPanelizer expects. Here is my resulting directory:

Notice the .gko file

4. Load the designs into Gerber Panelizer

Open up GerberPanelizer, you will be greeted with this screen:

Select filenew to create a new project. Next, select board placementadd gerber folder and navigate to the output folder from KiCAD. In this example, it was tx-gerbers.

You should be seeing something like this:

Where is the board?! Select board placementautopack: native and your design will leap into view:

Now, re-do the guide up until this point for however many unique designs you want to add to this panel. If you want to duplicate your design multiple times in the same panel, you can add an instance by right clicking on the instance in the right hand view and then clicking add instance.

5. Arrange designs and add tabs

Since you’ve been hitting board placementautopack: native after each board add, your designs should be properly arranged at this point. You can manually move the designs by clicking and dragging them, but I’ve found that using the autopack works really really well. Here’s what my design looks like at this point:

To join the designs together, you need to add breaktabs.

Select breaktabsinsert breaktab, and a small red circle will appear in the top left hand corner of the workspace:

Click and drag the tab between the two designs. Make sure black dots appear on either edge of the design:

Continue to add tabs in the same manner until the text turns a bright green color, this lets you know that the boards will be secured.

There is no way to automatically add the proper tabs, so make sure you use your best judgement.

Now we’re ready to export!

6. Export the panelized design

It’s a good idea to first save the design in GerberPanelizer so you can edit the layout later without having to start from scratch. Once you export the final merged gerber files, they cannot be edited or re-arranged. Select filesave as to save the project.

Now to export the gerbers.

Again, in GerberPanelizer, select fileexport merged gerbers and choose an empty output directory. The directory has to be empty because you typically send a zip archive of all gerbers to the manufacturer to get made, and this zip archive should just include this export. You should see this window pop up:

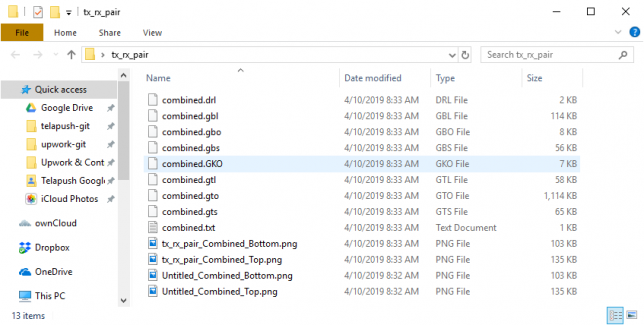
The contents of the merged output directory should look like this:

The merged output directory will include several image renderings of your merged designs, this is a great first check to make sure that everything went well.

Looks good! However before you send any critical designs off for manufacturing it’s best practice to visually inspect the layers with a gerber viewer. Save the merged output directory as a .zip file.

7. Verify using GerbView

KiCAD ships with a program called GerbView to inspect gerber files. Open that gerbview and then open your zipped merged output directory with fileopen zip archive file.

There will be an error message which you can ignore.

You should see something like this:

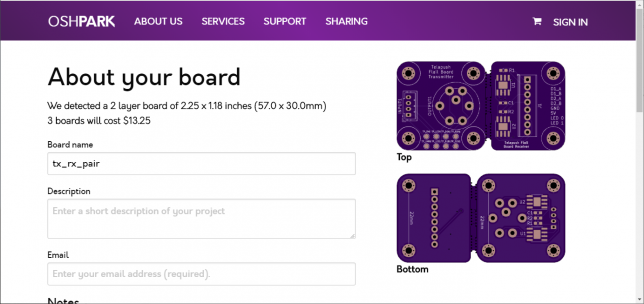
There’s the design as we expect it, you can uncheck the different layers on the right pane just like in pcbnew to inspect them one by one. I’ve uploaded this design to oshpark (a domestic PCB fab service) to see if their preview also looks correct and again, there are no problems.

You’re now ready to send your panelized designs out for manufacturing. Congrats!

8. Wrap up

Thanks for reading! Did this guide work for you? Let me know in the comments below this post.

Note: This is confirmed to work with KiCAD 4 and 5.

Sources

Play multiple sound files on multiple output devices with Python and sounddevice

Ever wanted to have multiple different sound files playing on different output devices attached to a host computer? Say you’re writing a DJing application where you want one mix for headphones and one for the speakers. Or you’re doing some sort of kiosk or art installation where you have many sets of speakers that need to all be playing their own sound file but the whole thing needs to be synchronized. This would even be cool for something like an escape room.

The ladder example is where I needed this bit of code. I’ve been working with interdisciplinary artist Sara Dittrich on a few projects recently and she asked if I could come up with a way to play 8 different mono sound files on 8 different loudspeakers. Here’s a video of the whole setup in action, and an explanation of the project:

I’ve wrapped up all of the code for the art installation project, and that can be found in a github repo here. It includes the startup functionality etc. If you’re interested in recreating the video above, that repo would be a good starting place. The following is a list of the parts used to make that build happen:

Multi-Audio Example

It is worth it to give a simple example of how to play multiple files on multiple audio devices using python. I couldn’t find an examples on how to do this online and had to spend some time experimenting to make it all come together. Hopefully this saves you the trouble.

To install sounddevice on my Raspberry Pi, I had to run the following commands:

sudo apt-get install python3-pip python3-numpy libportaudio2 libsndfile1 libffi-dev
python3 -m pip install sounddevice soundfile

For this example, let’s say there are 4 audio files in the same directory as multi.py , so the directory looks like this:

multi_audio/
├── 1.wav
├── 2.wav
├── 3.wav
├── 4.wav
└── multi.py

The code is based on the sounddevice library for python, whose documentation is pretty sparse. This script will find the audio files, and then play them on as many devices as there are attached. For example, if you have 3 sound devices it will play 1.wav, 2.wav and 3.wav on devices 1-3. If you have any questions, feel free to ask:

"""
multi.py, uses the sounddevice library to play multiple audio files to multiple output devices at the same time
Written by Devon Bray (dev@esologic.com)
"""

import sounddevice
import soundfile
import threading
import os


DATA_TYPE = "float32"


def load_sound_file_into_memory(path):
    """
    Get the in-memory version of a given path to a wav file
    :param path: wav file to be loaded
    :return: audio_data, a 2D numpy array
    """

    audio_data, _ = soundfile.read(path, dtype=DATA_TYPE)
    return audio_data


def get_device_number_if_usb_soundcard(index_info):
    """
    Given a device dict, return True if the device is one of our USB sound cards and False if otherwise
    :param index_info: a device info dict from PyAudio.
    :return: True if usb sound card, False if otherwise
    """

    index, info = index_info

    if "USB Audio Device" in info["name"]:
        return index
    return False


def play_wav_on_index(audio_data, stream_object):
    """
    Play an audio file given as the result of `load_sound_file_into_memory`
    :param audio_data: A two-dimensional NumPy array
    :param stream_object: a sounddevice.OutputStream object that will immediately start playing any data written to it.
    :return: None, returns when the data has all been consumed
    """

    stream_object.write(audio_data)


def create_running_output_stream(index):
    """
    Create an sounddevice.OutputStream that writes to the device specified by index that is ready to be written to.
    You can immediately call `write` on this object with data and it will play on the device.
    :param index: the device index of the audio device to write to
    :return: a started sounddevice.OutputStream object ready to be written to
    """

    output = sounddevice.OutputStream(
        device=index,
        dtype=DATA_TYPE
    )
    output.start()
    return output


if __name__ == "__main__":

    def good_filepath(path):
        """
        Macro for returning false if the file is not a non-hidden wav file
        :param path: path to the file
        :return: true if a non-hidden wav, false if not a wav or hidden
        """
        return str(path).endswith(".wav") and (not str(path).startswith("."))

    cwd = os.getcwd()
    sound_file_paths = [
        os.path.join(cwd, path) for path in sorted(filter(lambda path: good_filepath(path), os.listdir(cwd)))
    ]

    print("Discovered the following .wav files:", sound_file_paths)

    files = [load_sound_file_into_memory(path) for path in sound_file_paths]

    print("Files loaded into memory, Looking for USB devices.")

    usb_sound_card_indices = list(filter(lambda x: x is not False,
                                         map(get_device_number_if_usb_soundcard,
                                             [index_info for index_info in enumerate(sounddevice.query_devices())])))

    print("Discovered the following usb sound devices", usb_sound_card_indices)

    streams = [create_running_output_stream(index) for index in usb_sound_card_indices]

    running = True

    if not len(streams) > 0:
        running = False
        print("No audio devices found, stopping")

    if not len(files) > 0:
        running = False
        print("No sound files found, stopping")

    while running:

        print("Playing files")

        threads = [threading.Thread(target=play_wav_on_index, args=[file_path, stream])
                   for file_path, stream in zip(files, streams)]

        try:

            for thread in threads:
                thread.start()

            for thread, device_index in zip(threads, usb_sound_card_indices):
                print("Waiting for device", device_index, "to finish")
                thread.join()

        except KeyboardInterrupt:
            running = False
            print("Stopping stream")
            for stream in streams:
                stream.abort(ignore_errors=True)
                stream.close()
            print("Streams stopped")

    print("Bye.")

Here are some more photos of the build: