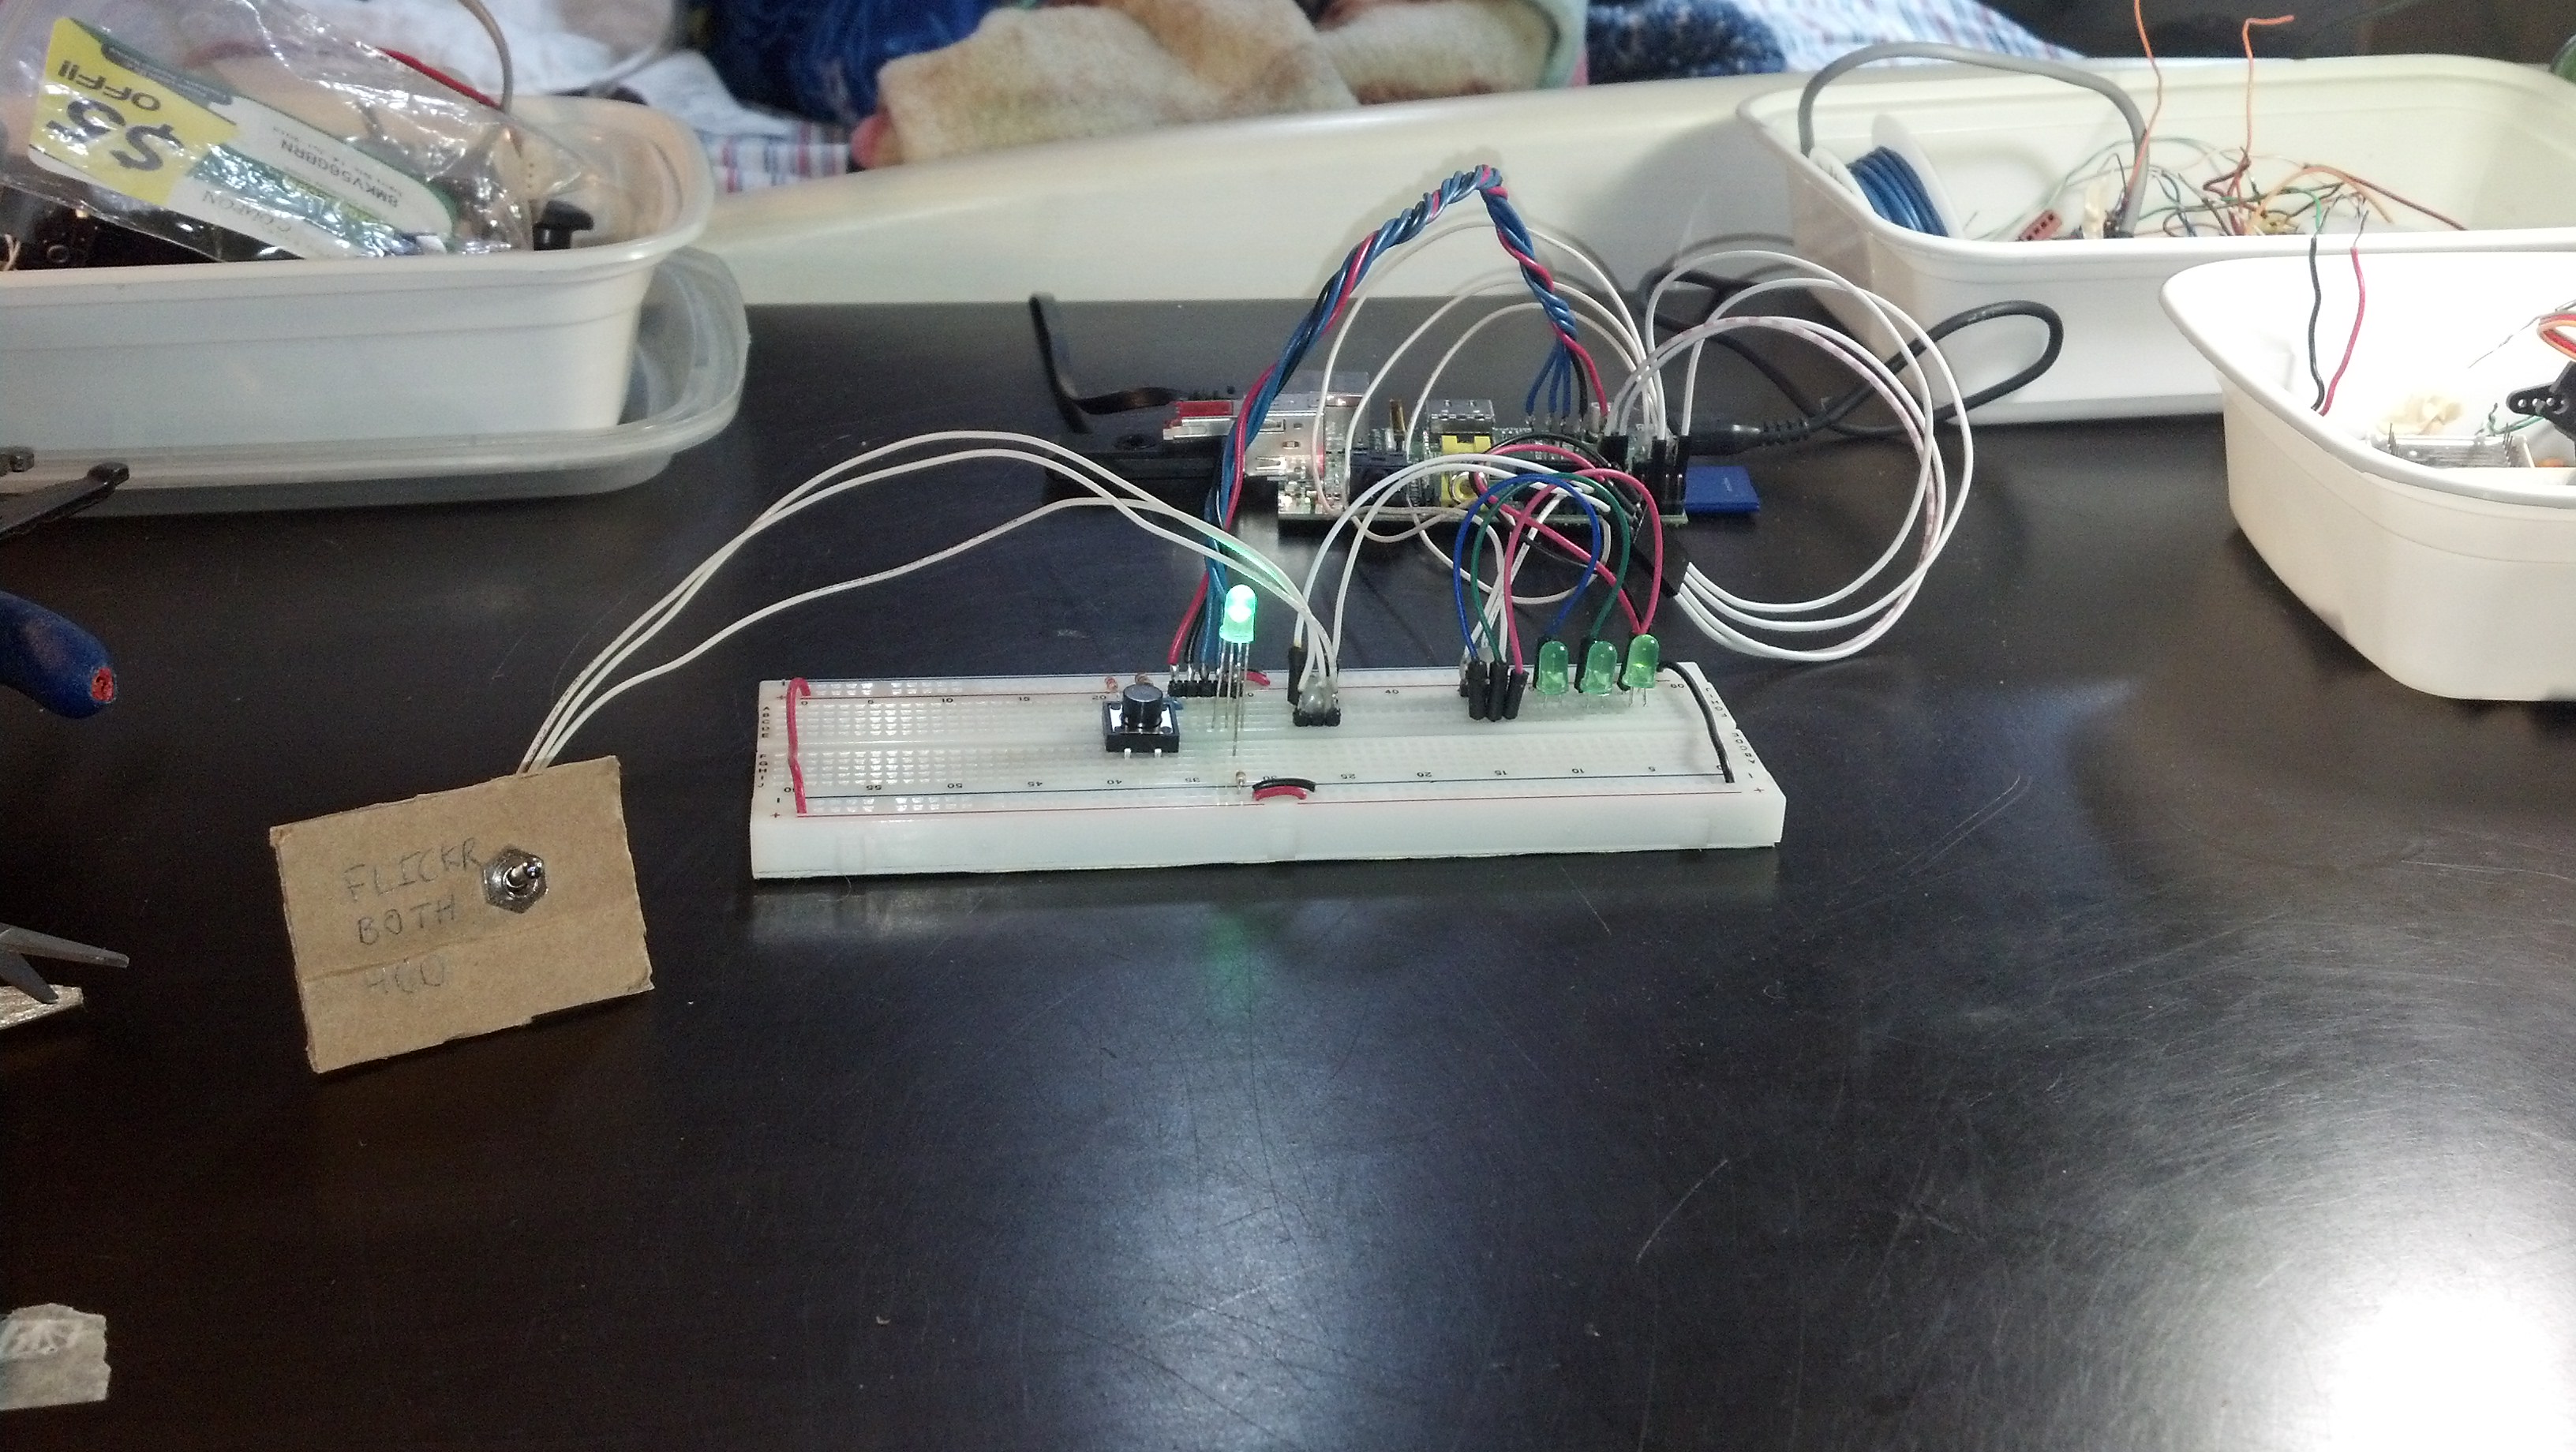
Big post for this project, here’s a video:
This version of the code implements a few really cool features.
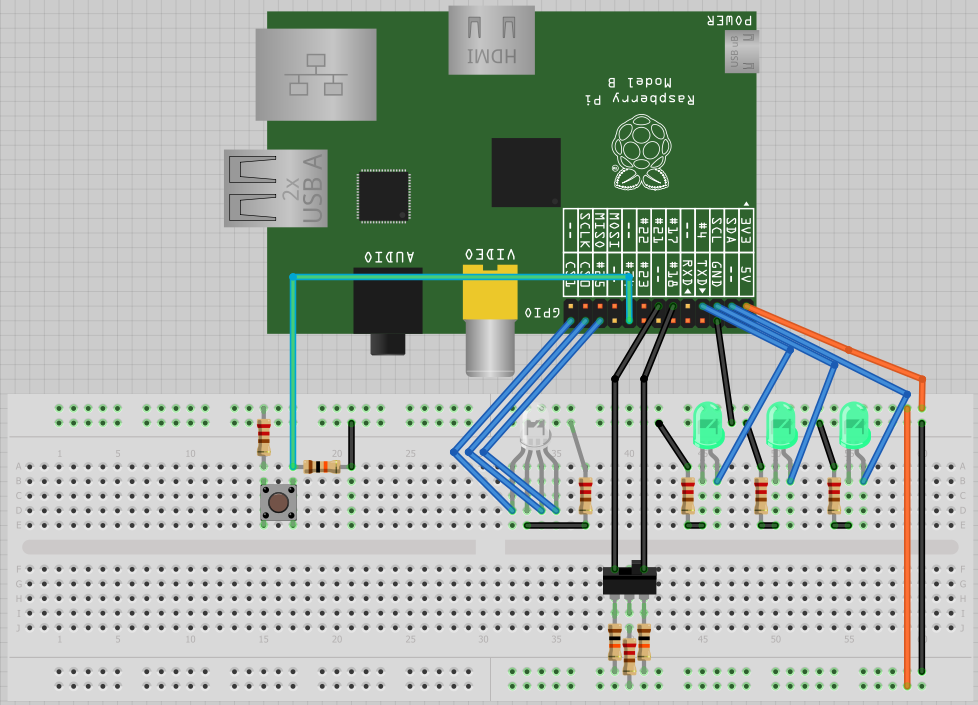
First things first I added 10 LEDs that display the percent uploaded of the batch. For example if 13 / 100 photos have been uploaded, the first LED will light up. If 56 / 100 the first 5 LEDs will light up. Eventually the 10 junk LEDs will be replaced with a bar graph which will be mounted externally on the front panel of the enclosure.
I am using every single available output on my Pi now, but I was able to get away with adding 1 more LED that I should be able to use by using a transistor array explained here:
On the code side of things, I updated the way photos are added to the set. It uses the same principal as described in the previous post (using APscheduler to do the adding on an interval). All of these changes can be seen below, it’s still very poorly commented however.
#GPIO setup
import RPi.GPIO as GPIO
GPIO.setmode(GPIO.BOARD)

in_flickr = 11
GPIO.setup(in_flickr, GPIO.IN)
in_hdd = 13
GPIO.setup(in_hdd, GPIO.IN)
button = 15
GPIO.setup(button, GPIO.IN)

flickr_LED = 3
GPIO.setup(flickr_LED, GPIO.OUT)
both_LED = 5
GPIO.setup(both_LED, GPIO.OUT)
hdd_LED = 7
GPIO.setup(hdd_LED, GPIO.OUT)

stat_LED = 26
GPIO.setup(stat_LED, GPIO.OUT)

LED_bar_1 = 18
GPIO.setup(LED_bar_1, GPIO.OUT)
LED_bar_2 = 16
GPIO.setup(LED_bar_2, GPIO.OUT)
LED_bar_3 = 23
GPIO.setup(LED_bar_3, GPIO.OUT)
LED_bar_4 = 21
GPIO.setup(LED_bar_4, GPIO.OUT)
LED_bar_5 = 19
GPIO.setup(LED_bar_5, GPIO.OUT)
LED_bar_6 = 12
GPIO.setup(LED_bar_6, GPIO.OUT)
LED_bar_7 = 10
GPIO.setup(LED_bar_7, GPIO.OUT)
LED_bar_8 = 8
GPIO.setup(LED_bar_8, GPIO.OUT)
LED_bar_9 = 24
GPIO.setup(LED_bar_9, GPIO.OUT)
LED_bar_10 = 22
GPIO.setup(LED_bar_10, GPIO.OUT)

global led_bar
led_bar = []

led_bar.insert(0,18)
led_bar.insert(1,16)
led_bar.insert(2,23)
led_bar.insert(3,21)
led_bar.insert(4,19)
led_bar.insert(5,12)
led_bar.insert(6,10)
led_bar.insert(7,8)
led_bar.insert(8,24)
led_bar.insert(9,22)

for x in xrange(10):
			GPIO.output(led_bar[x],False)

import os

from apscheduler.scheduler import Scheduler
import logging
logging.basicConfig()
import time

#Flickr Setup
import flickrapi

api_key = ''
api_secret = ''

flickr = flickrapi.FlickrAPI(api_key, api_secret, format='json', cache=True)

(token, frob) = flickr.get_token_part_one(perms='write')
if not token: raw_input("Press ENTER after you authorized this program")
flickr.get_token_part_two((token, frob))

#email setup
import smtplib

import math

def sd_walk():

	global file_list
	global file_number
	global filename
	global file_current

	global file_size
	global file_size_total

	print '-Starting File Index'

	for path, subdirs, files in os.walk(image_dir):
		for filename in files:
				if os.path.splitext(filename)[1].lower() in ('.jpg','jpeg'):

					listfiles = os.path.join(path, filename)

					file_list.insert(file_number,listfiles)
					print '--File: ' + str(file_number+1) + ' - ' + 'Size: ' + str(round(float(os.path.getsize(listfiles))/(1024),2)) + ' KB ' + ' Added To List: ' + str(listfiles)
					file_size_total = file_size_total + os.path.getsize(listfiles)
					file_number = file_number + 1

	print '-Indexing Completed ' + 'Total Files: ' + str(file_number) + ' - Total Size: ' + str(round(float(file_size_total)/(1024*1024*1024),2)) + ' GB' + '\n'
	print '---Starting Upload'

def upload_file():

	global file_list
	global file_number
	global filename
	global listfiles
	global file_current

	global file_size
	global file_size_total

	global led_bar

	if file_current == int(len(file_list)):
		print '\n----All Files Dealt With...Terminating \n'
		global scheduler
		scheduler.shutdown(shutdown_threadpool=False)
	else:

		percent = round((float(file_current+1) / float(len(file_list)))*100,0)
		led = round((float(file_current+1) / float(len(file_list)))*10,0)

		file_size = file_size + float(os.path.getsize(file_list[file_current]))/(1024)

		print '----File: ' +  str(file_current+1) + ' / ' + str(len(file_list)) + ' - ' + str(round(file_size,2)) + ' KB' + ' / ' + str(round(float(file_size_total)/(1024*1024*1024),2)) + ' GB' + ' - ' + str(percent) + '% Done' + ' - ' + 'LEDs: ' + '1-' + str(led) + ' Lit'
		print '------File For Upload: ' + file_list[file_current]

		for x in xrange(int(led)):
			GPIO.output(led_bar[x],True)

		upload_response = flickr.upload(filename = file_list[file_current], format='etree')
		upload_ID = upload_response.find('photoid').text
		print '------Uploaded - Photo ID: ' + upload_ID

		id_list.insert(file_current,upload_ID)

		file_current = file_current + 1

def flickr_upload():

	global id_list
	id_list = []

	global file_list
	file_list = []

	global file_current
	file_current = 0

	global file_number
	file_number = 0

	global file_size
	file_size = 0

	global file_size_total
	file_size_total = 0

	sd_walk()

	global scheduler
	scheduler = Scheduler(standalone=True)
	scheduler.add_interval_job(upload_file,seconds=20)
	scheduler.start()

	print '--Uploading completed - Adding Files To Set'

	set_name = 'Uploaded At ' + time.strftime('%m-%d-%y_%H-%M-%S')
	print '\n---Creating Set: ' + set_name
	print '---Primary Photo: ' + id_list[0]
	json_string = flickr.photosets_create(title=set_name, primary_photo_id=id_list[0])
	global set_id
	set_id = json_string.split('"')[5]
	print '---Set Created: ' + set_id
	print '---Adding Files To list'

	global flickr_setno
	flickr_setno = 0

	global scheduler
	scheduler = Scheduler(standalone=True)
	scheduler.add_interval_job(flickr_addset,seconds=1)
	scheduler.start()

	print '--All Photos Added, Flickr Process Complete \n'

	flickr_email(set_id,file_current,set_name)

def flickr_addset():

	global id_list
	global set_id
	global flickr_setno

	if flickr_setno == int(len(id_list)):
		print '\n---All IDs Dealt With...Terminating \n'
		global scheduler
		scheduler.shutdown(shutdown_threadpool=False)

	else:
		flickr.photosets_addPhoto(photoset_id=set_id, photo_id=id_list[flickr_setno])
		print '----Photo: ' + str(flickr_setno+1) + ' Of ' + str(len(id_list)) + ' Added To Set: ' + str(set_id) + ' ID: ' + str(id_list[flickr_setno])
		flickr_setno = flickr_setno + 1

def flickr_email(idd,total_files,name):

	global file_size_total

	fromaddr = ''
	toaddrs = ''
	username = ''
	password = ''
	server = smtplib.SMTP('smtp.gmail.com:587')
	server.ehlo()
	server.starttls()
	server.ehlo()
	server.login(username,password)

	print 'Sending Email'

	SUBJECT = 'Your Photos Have Been Uploaded!'

	TEXT = (

		'Hello! \n\n'
		'You Uploaded a total of: ' + str(total_files) + ' Files' '\n'
		'Which Was: ' + str(float(file_size_total)/(1024*1024*1024)) + ' GB' + '\n\n'

		'Your Set is Named: "' + str(name) + '" \n\n'
		'You can View These Photos Here: \n'

		'http://www.flickr.com/photos/99154806@N04/sets/' + str(idd)

		)

	msg = 'Subject: %s\n\n%s' % (SUBJECT, TEXT)
	server.sendmail(fromaddr, toaddrs, msg)
	time.sleep(10)
	server.quit
	print 'Email Sent \n'

while 1:

	global led_bar

	GPIO.output(stat_LED, False)

	if GPIO.input(in_flickr):
		#print "left"
		GPIO.output(flickr_LED, True)
		GPIO.output(both_LED, False)
		GPIO.output(hdd_LED, False)

	elif GPIO.input(in_hdd):
		#print "right"
		GPIO.output(flickr_LED, False)
		GPIO.output(both_LED, False)
		GPIO.output(hdd_LED, True)

	else:
		#print "mid"
		GPIO.output(flickr_LED, False)
		GPIO.output(both_LED, True)
		GPIO.output(hdd_LED, False)

	if GPIO.input(button):
		GPIO.output(stat_LED, True)

		print '\n======Start=====\n'

		print 'Mounting SD'
		time.sleep(10)
		global image_dir

		image_dir = '/mnt/SD/'
		os.system('hdparm -z /dev/sda1/')
		os.system('mount -t vfat /dev/sda1/ ' + image_dir)
		print 'SD Mounted \n'

		if GPIO.input(in_flickr):

			flickr_upload()

			print 'SD Unmouting'
			time.sleep(10)
			os.system('umount -t vfat /dev/sda1/ ' + image_dir)
			print 'SD Unounted'
			print '======End======'
			GPIO.output(stat_LED, False)

			for x in xrange(10):
				GPIO.output(led_bar[x],False)

		elif GPIO.input(in_hdd):

			hdd_upload()

			print 'SD Unmouting'
			time.sleep(10)
			os.system('umount -t vfat /dev/sda1/ ' + image_dir)
			print 'SD Unounted'
			print '======End======'
			GPIO.output(stat_LED, False)

			for x in xrange(10):
				GPIO.output(led_bar[x],False)

		else:

			both_upload()

			print 'SD Unmouting'
			time.sleep(10)
			os.system('umount -t vfat /dev/sda1/ ' + image_dir)
			print 'SD Unounted'
			print '======End======'
			GPIO.output(stat_LED, False)

			for x in xrange(10):
				GPIO.output(led_bar[x],False)
Thanks for reading!